How to Deploy a Flask App on Heroku with Amazon S3 for File Uploads
Build a small photo app, keep the photos safe in a private S3 bucket, and run it on Heroku in about an hour.
You have a Flask app that works on your laptop. Now you want to put it online. Your app also lets users upload files.
In this guide, you will deploy a small Flask app called PhotoBook to Heroku. Users can upload photos and see them in a grid. The photos are stored in Amazon S3 (Simple Storage Service), a service from AWS that stores files.
Why not keep the files on the Heroku server? Because Heroku deletes them. You will see why in Step 1. S3 keeps your files safe, and it can grow to any size.
The browser will upload files straight to S3 with a presigned URL (a temporary link that S3 trusts). All the code is in this post.
What we are building
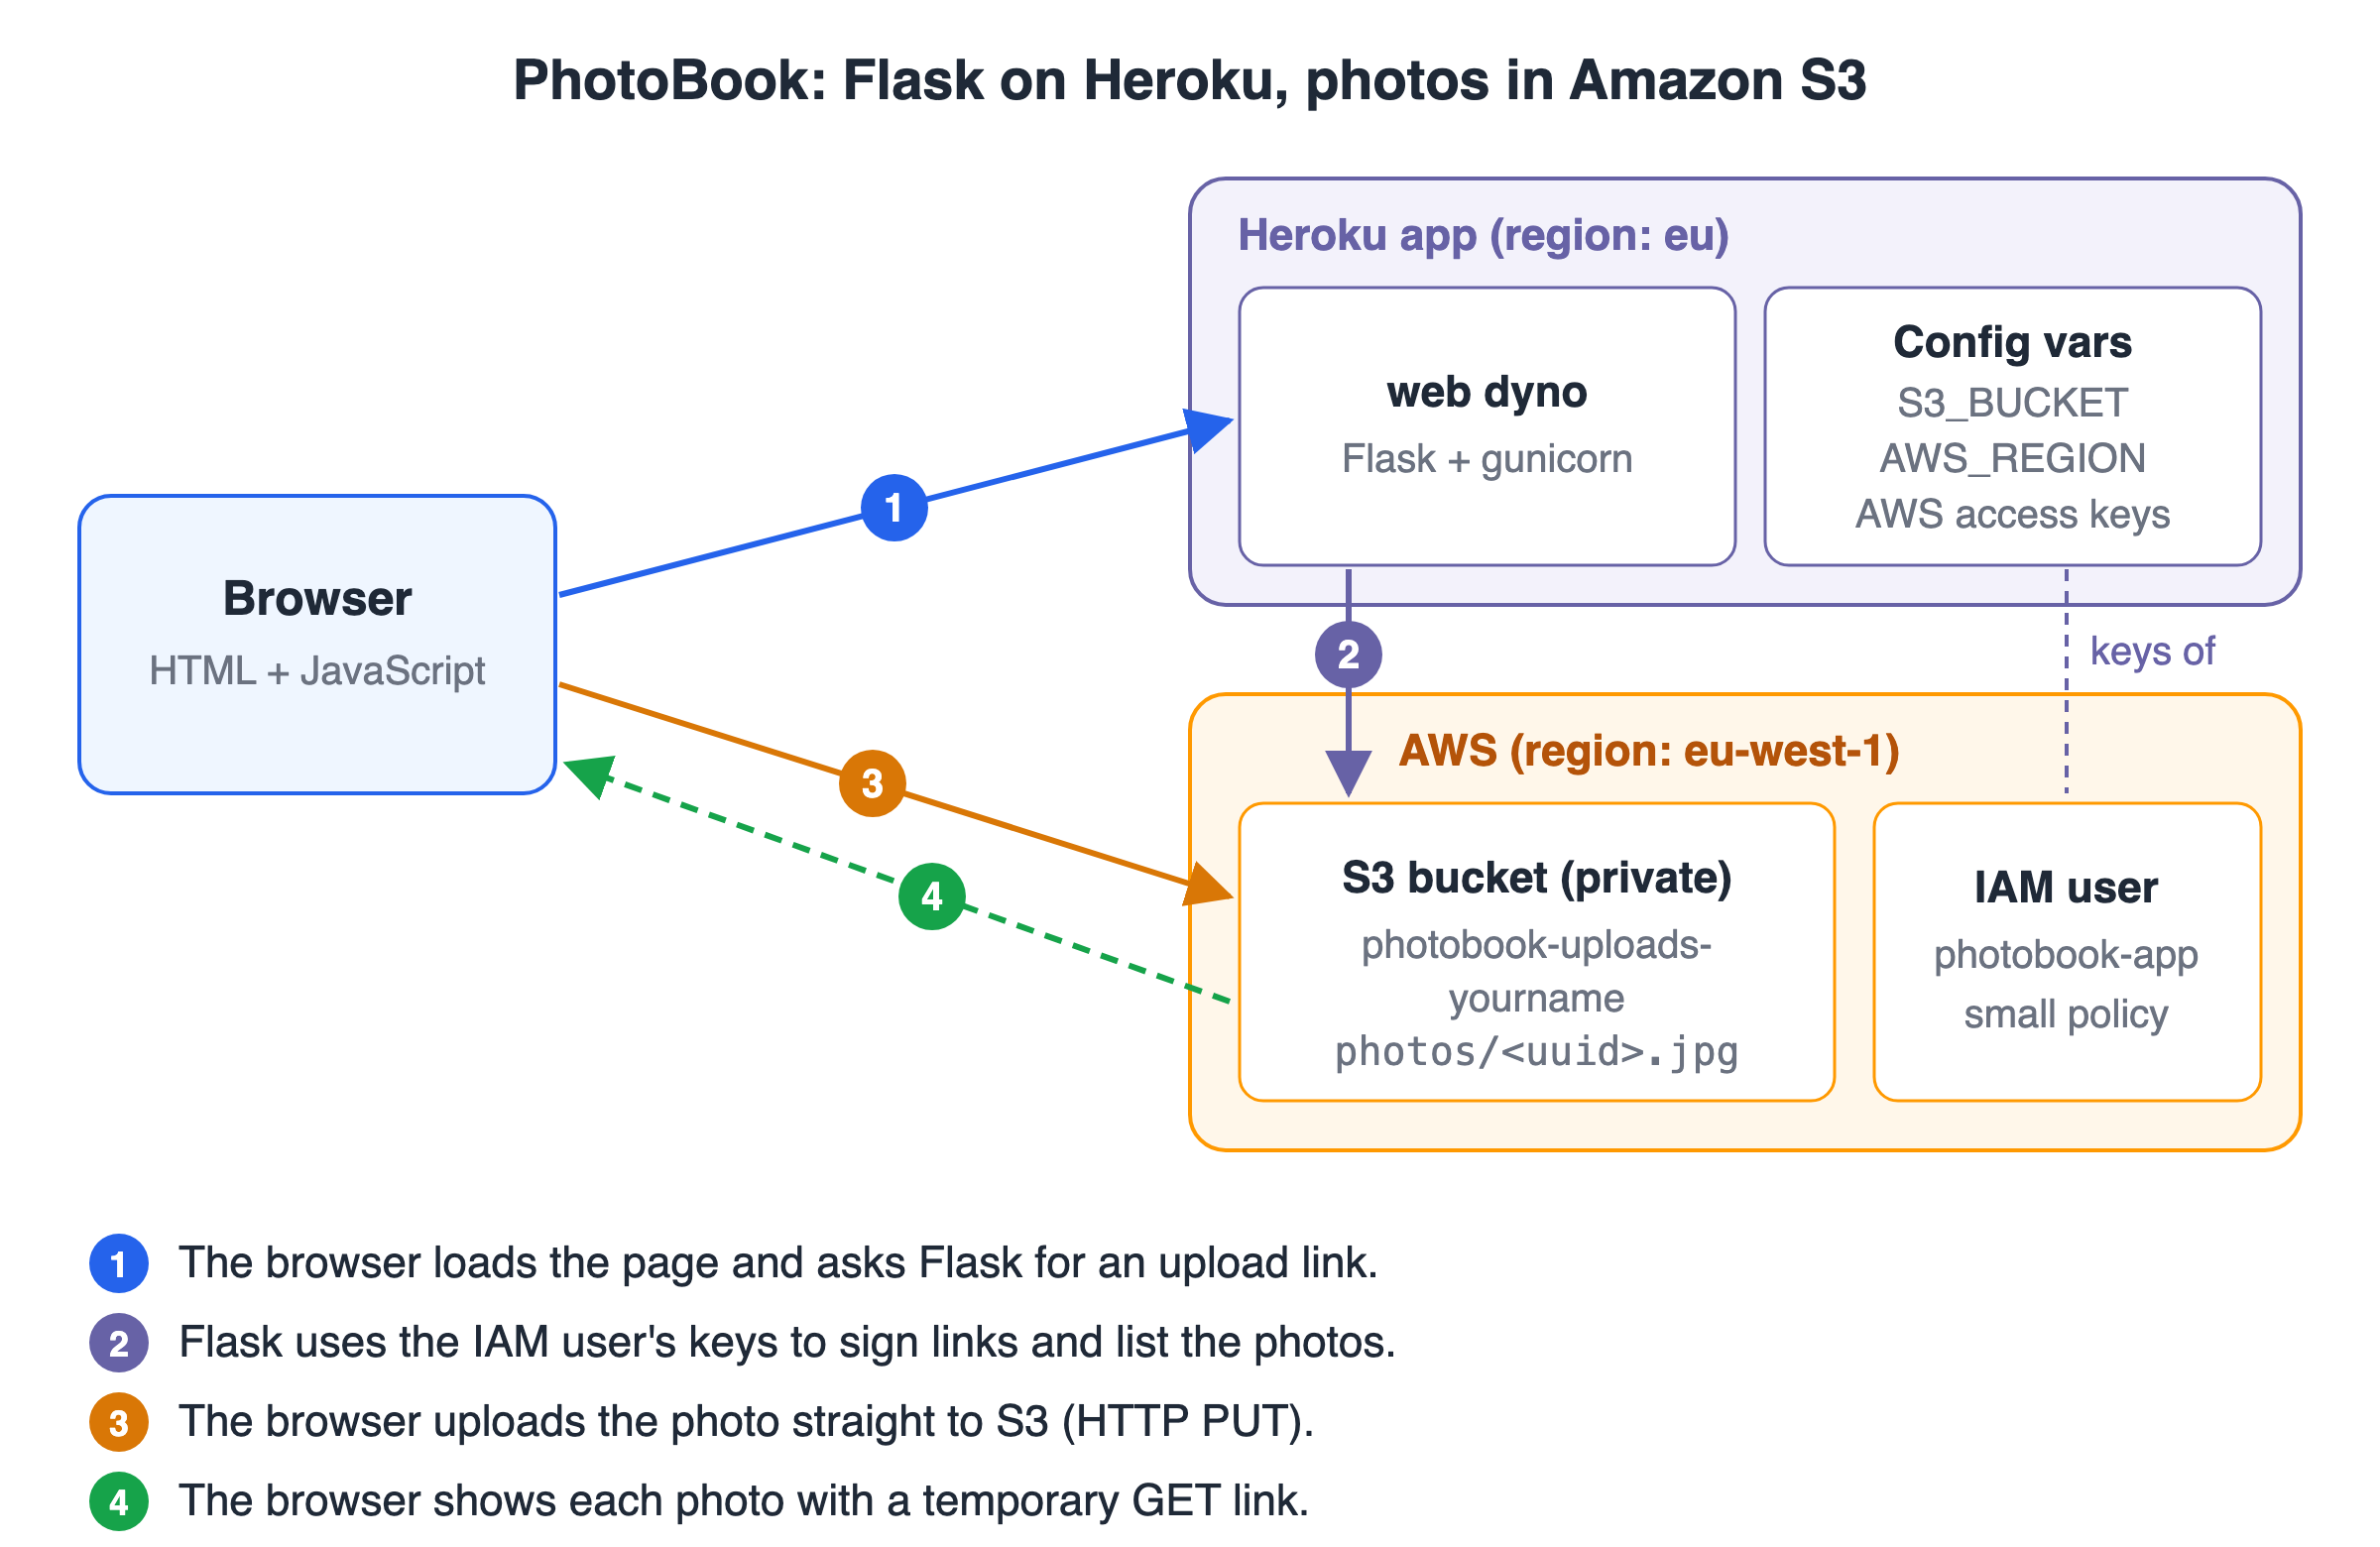
PhotoBook: Flask runs on Heroku, and the photos live in a private S3 bucket.
Here is how the parts work together:
- The browser shows the page and uploads photos. It uses a little JavaScript.
- Flask on Heroku never touches the photo itself. It checks the file type and size, and it creates presigned URLs.
- The S3 bucket is private. Nobody can open a photo without a presigned URL.
- An IAM user (an AWS identity for a program) has access keys. Heroku gives these keys to the app as config vars (environment variables that Heroku stores for you).
Why does the browser upload straight to S3? The Heroku router stops any request that takes more than 30 seconds. A big photo on a slow phone can take longer than that. When the browser sends the file to S3 directly, your dyno (a Heroku container that runs your app) stays free and fast.
What you need
- Python 3.13 and Git on your computer.
- Basic Flask knowledge (routes and templates).
- An AWS account. You will use the S3 and IAM consoles.
- A Heroku account with a paid plan. Heroku has no free plan.
- The Heroku CLI (command line tool). Install it:
# macOS
brew install heroku/brew/heroku

# Ubuntu / Debian
curl https://cli-assets.heroku.com/install-ubuntu.sh | sh

# Windows: download the installer from
# https://devcenter.heroku.com/articles/heroku-cli

heroku --version
heroku login
This guide uses the Heroku eu region and the S3 region eu-west-1 (Europe, Ireland). Keep your app and your bucket close together, so uploads and page loads are fast. If your users are in the US, use the Heroku us region and the S3 region us-east-1 instead. Replace eu and eu-west-1 everywhere in this post.
What it costs
- Heroku: there is no free plan. On 27 September 2026, the pricing page listed Eco dynos at $5 per month and Basic dynos at $7 per month. Eco dynos sleep after 30 minutes with no traffic, so the first visit after that is slow. Check the Heroku pricing page before you start.
- Amazon S3: you pay for storage, requests and data transfer. A small test app costs very little, but check the S3 pricing page for your region.
- AWS Free Tier: it changed in July 2025. New accounts now get credits (up to $200) and a free plan for 6 months, instead of the old 12-month free tier. See aws.amazon.com/free for the current rules.
At the end of this guide, you will delete everything, so the cost stays small.
Step 1: Understand why the dyno disk is not enough
Your first idea may be to save uploads in a folder like static/uploads/. This works on your laptop. On Heroku, it fails.
Each dyno has an ephemeral filesystem. "Ephemeral" means temporary. Heroku restarts every dyno at least once a day. It also starts new dynos every time you deploy or change a config var. Each new dyno gets a fresh copy of your code, and any file your app wrote is deleted.
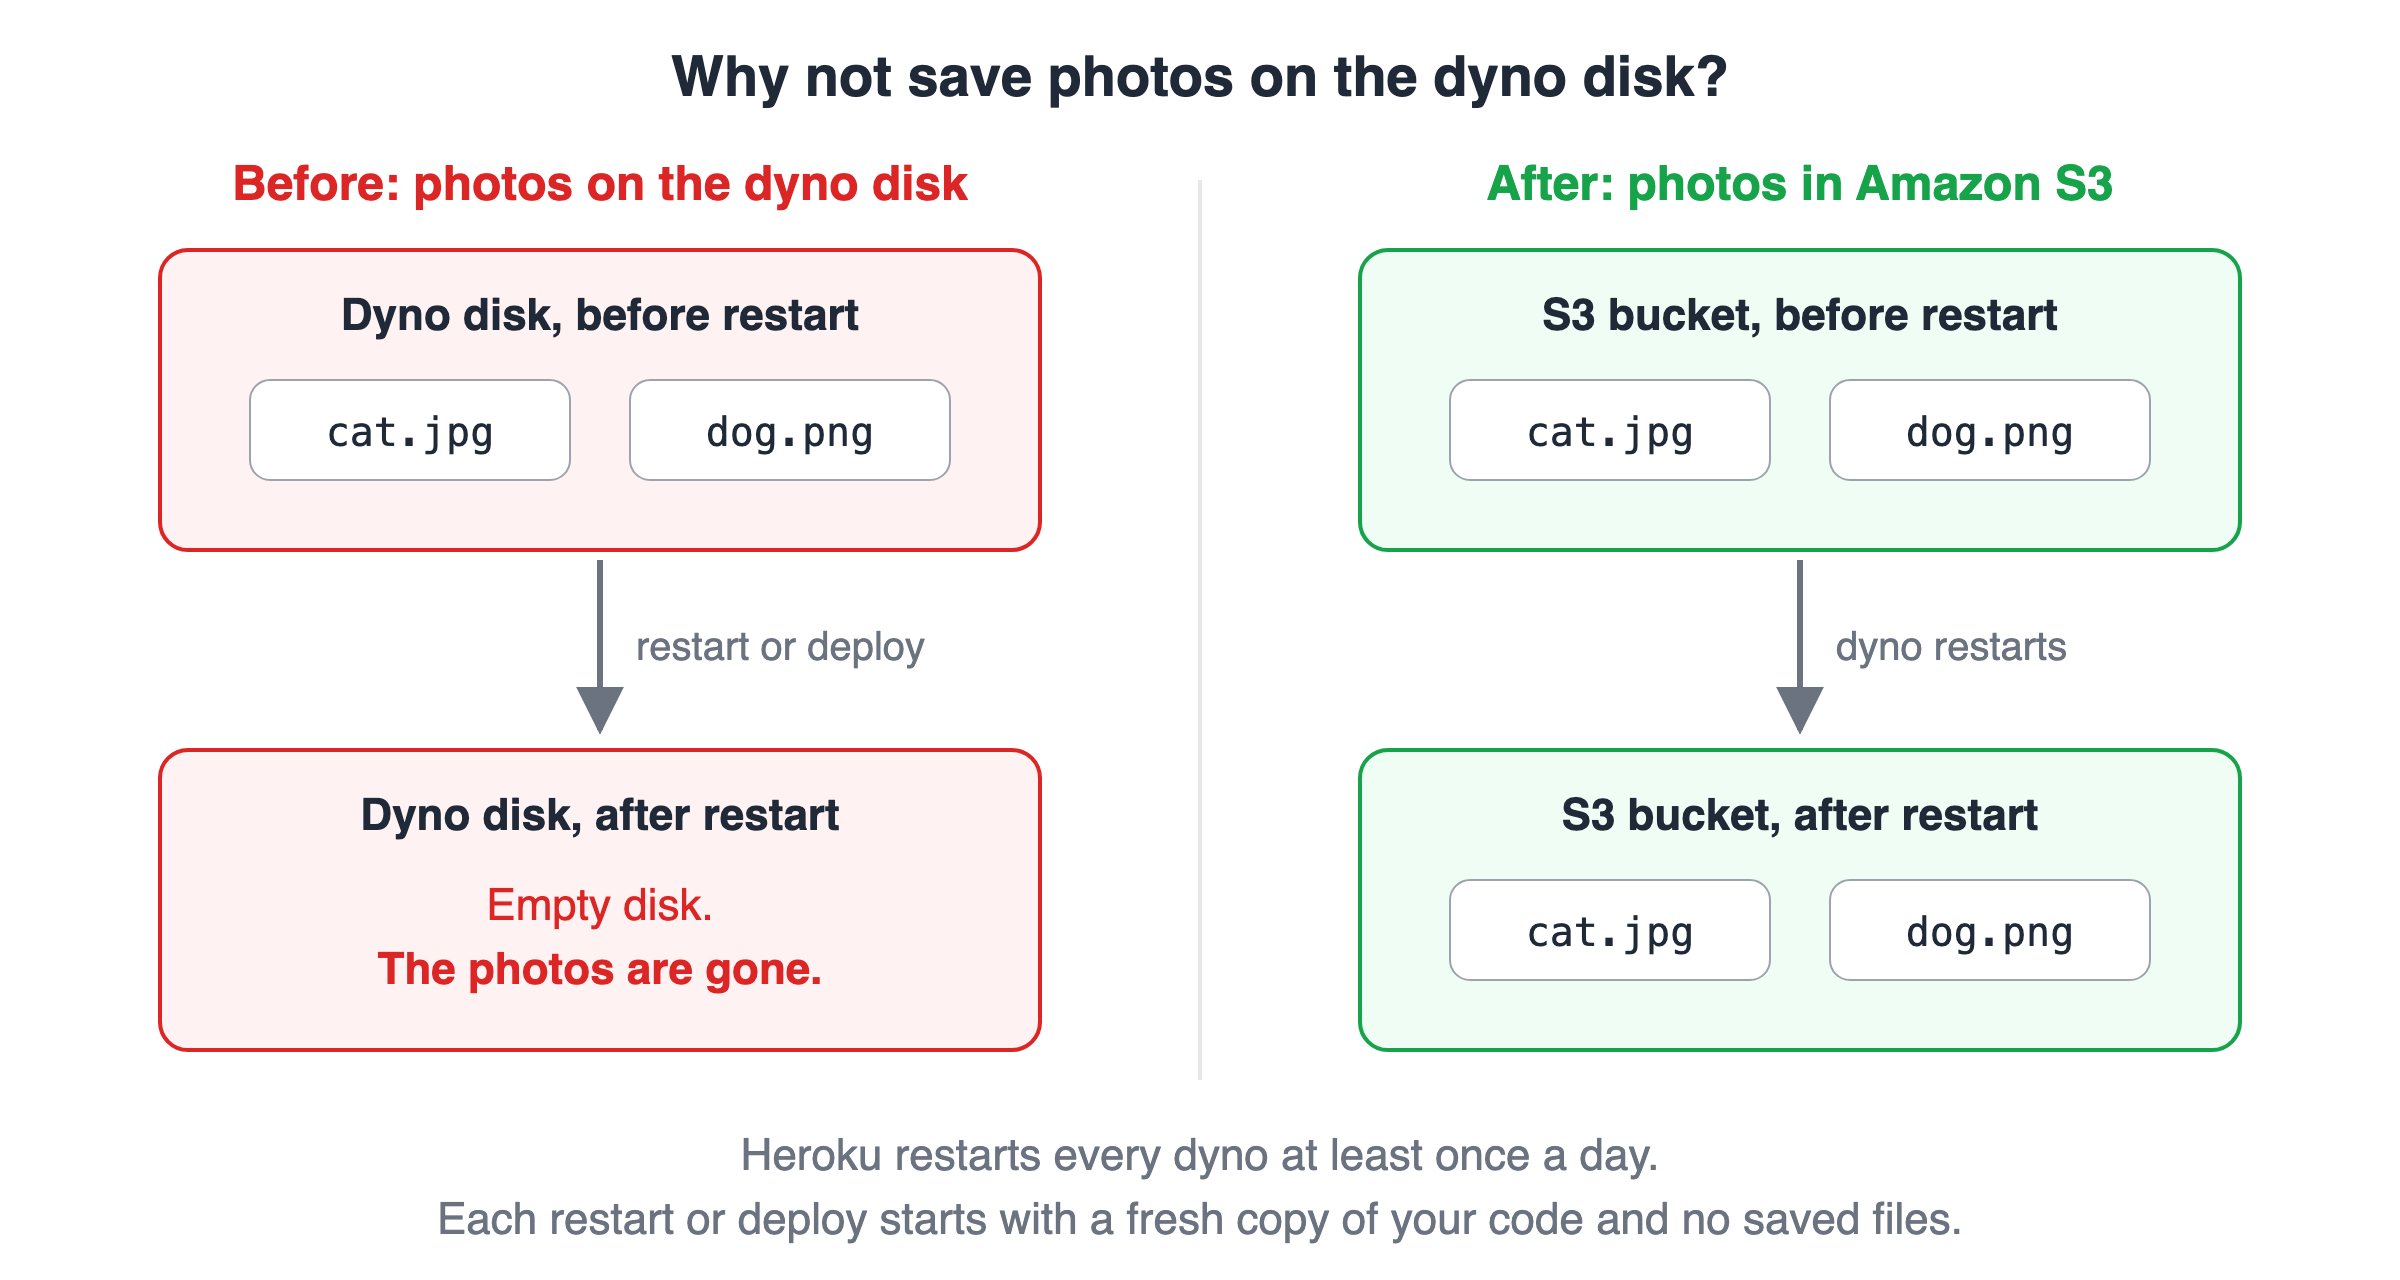
Files on the dyno disk disappear after a restart. Files in S3 stay.
Also, if you run two dynos, each one has its own disk. So we store every photo in S3.
Step 2: Create a private S3 bucket
A bucket is a container for files in S3. Each file in a bucket is called an object, and its name is called a key (for example photos/1f3c9a.jpg).
- Open the S3 console.
- In the top bar, choose the region Europe (Ireland) eu-west-1.
- In the left menu, choose General purpose buckets, then Create bucket.
- For Bucket name, type a unique name, for example
photobook-uploads-yourname. Use only lowercase letters, numbers and hyphens. - Keep Object Ownership as ACLs disabled (Bucket owner enforced).
- Under Block Public Access settings for this bucket, keep Block all public access turned on.
- Keep the default encryption (SSE-S3).
- Choose Create bucket.
Keep "Block all public access" turned on. The app uses presigned URLs, not public links.
If you like the command line, you can do the same with the AWS CLI:
aws s3api create-bucket \
  --bucket photobook-uploads-yourname \
  --region eu-west-1 \
  --create-bucket-configuration LocationConstraint=eu-west-1
You should see a short JSON reply with a Location line, similar to this:
{
    "Location": "http://photobook-uploads-yourname.s3.amazonaws.com/"
}
New buckets block public access by default, so you do not need to change anything else.
Step 3: Create an IAM user with a small policy
Your Flask app needs permission to use the bucket. On AWS servers, you would use an IAM role (temporary permissions that AWS gives to a server). Heroku runs outside AWS, so it cannot use a role. Instead, you create an IAM user for the app and give it access keys (a key ID and a secret, like a username and password for programs).
Keys that live a long time are risky. So we follow the rule of least privilege: the user can do only what the app needs, and only in one folder of one bucket.
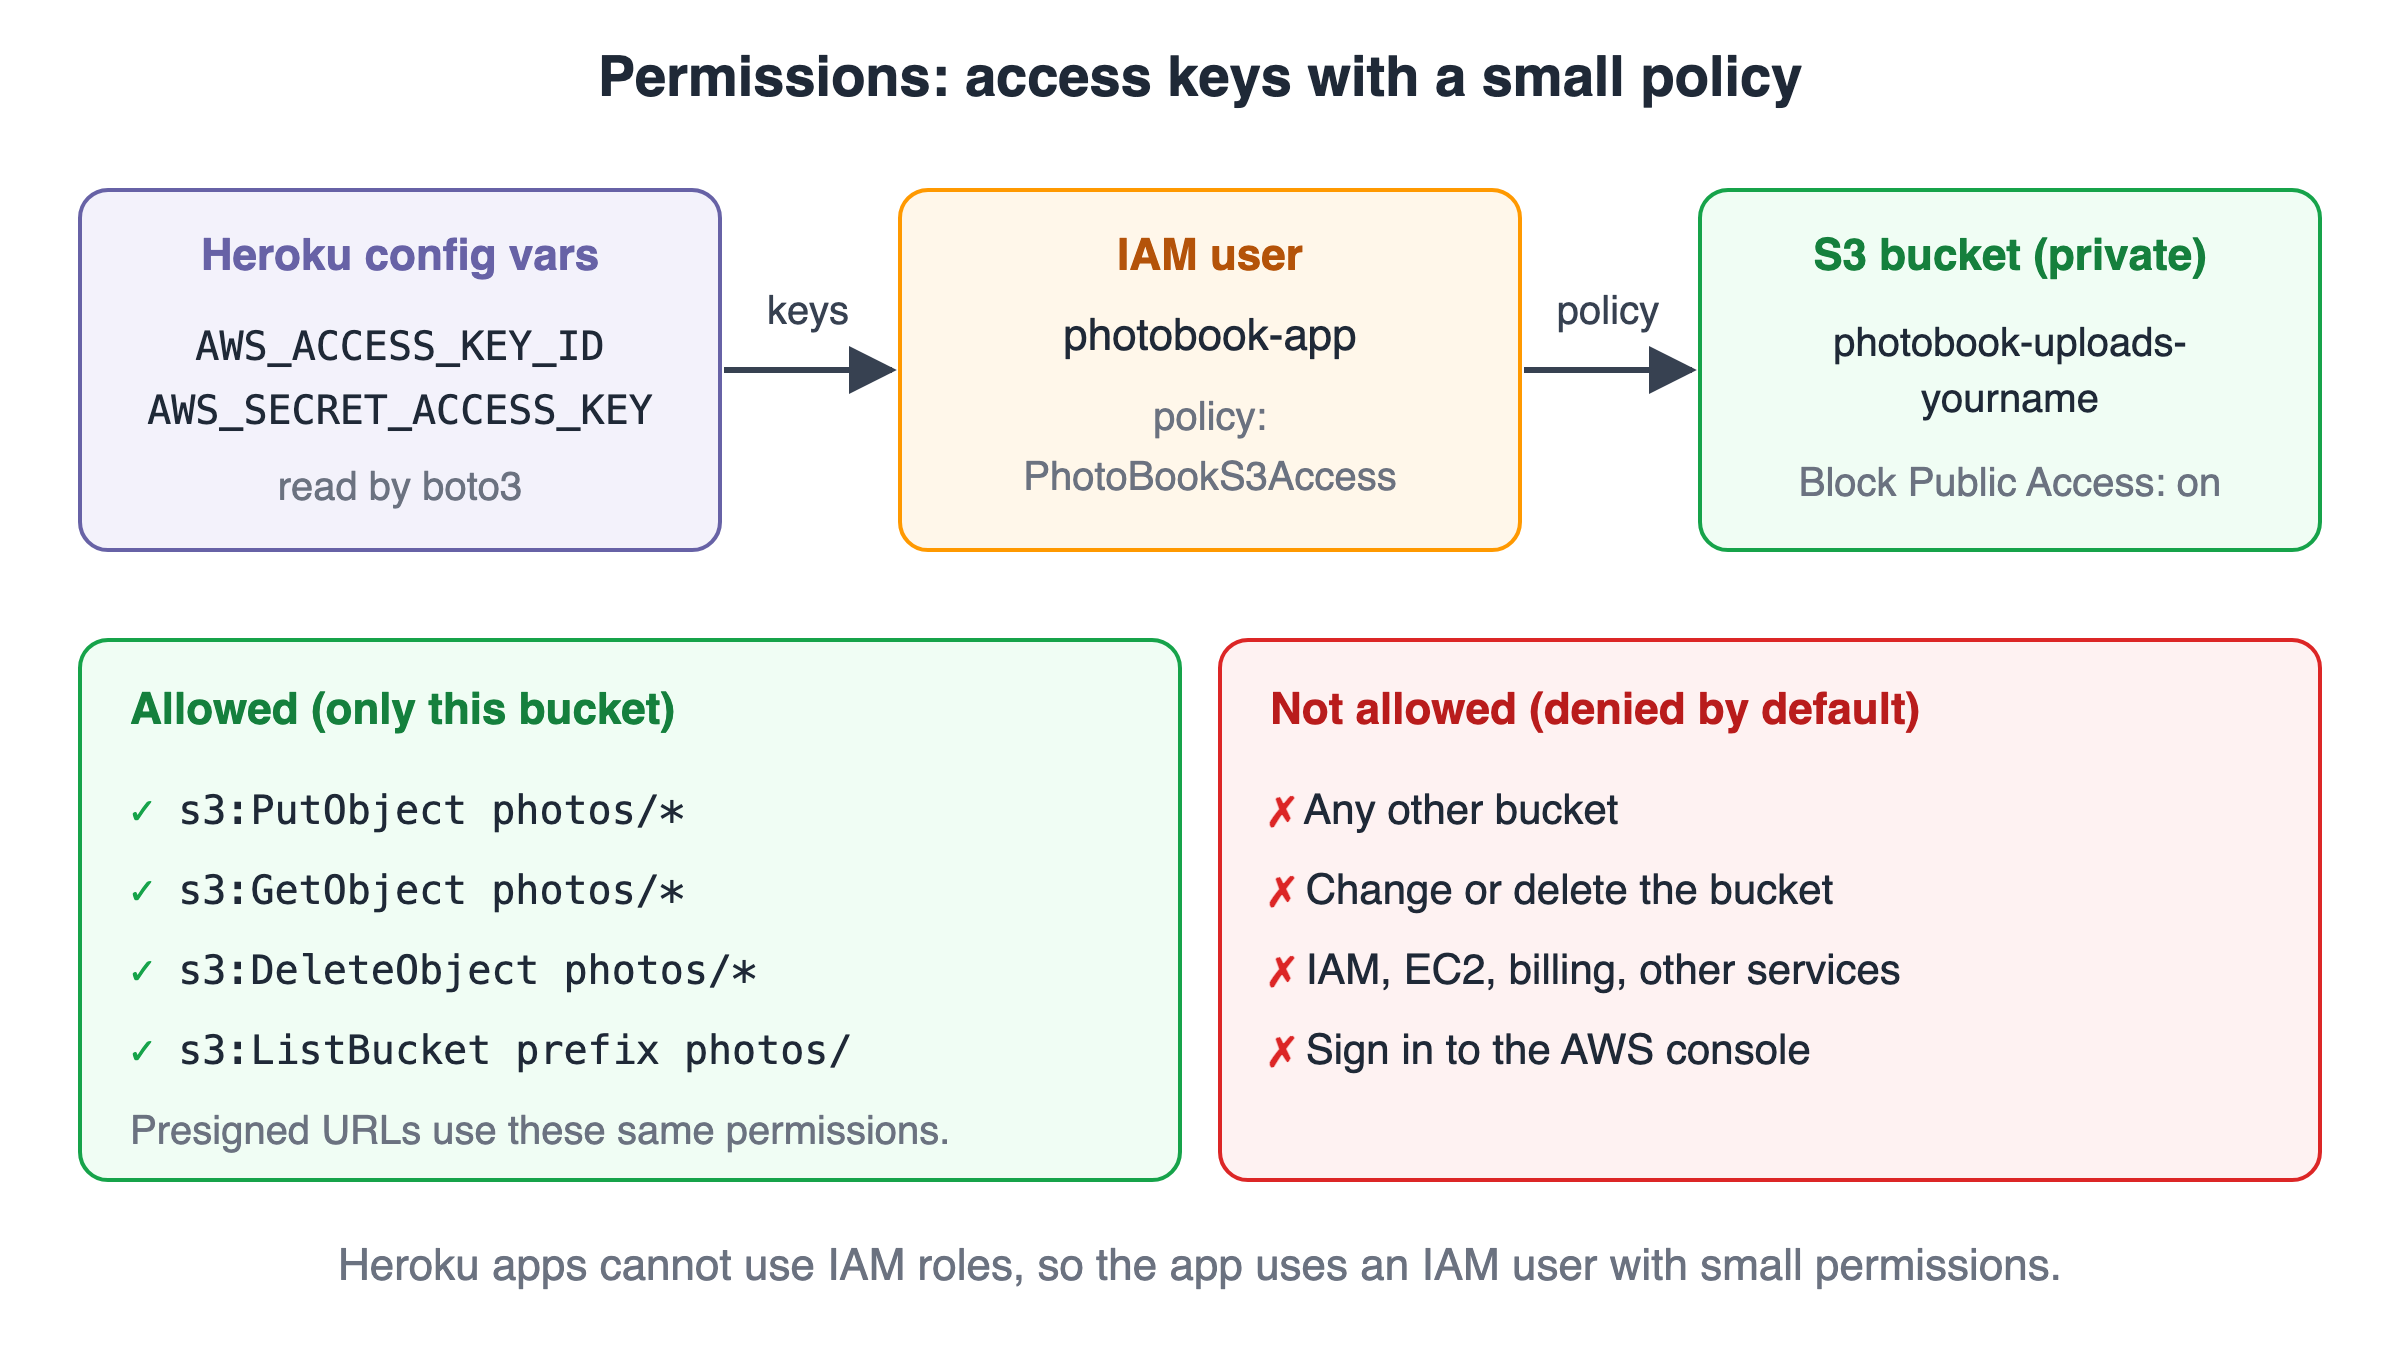
The IAM user can only read, write and delete objects under photos/ in one bucket.
3a. Create the policy
A policy is a JSON document that lists what is allowed.
- Open the IAM console.
- Choose Policies, then Create policy.
- Choose the JSON tab and paste this. Replace the bucket name in both places.
{
  "Version": "2012-10-17",
  "Statement": [
    {
      "Sid": "PhotoObjects",
      "Effect": "Allow",
      "Action": ["s3:PutObject", "s3:GetObject", "s3:DeleteObject"],
      "Resource": "arn:aws:s3:::photobook-uploads-yourname/photos/*"
    },
    {
      "Sid": "ListPhotos",
      "Effect": "Allow",
      "Action": "s3:ListBucket",
      "Resource": "arn:aws:s3:::photobook-uploads-yourname",
      "Condition": { "StringLike": { "s3:prefix": "photos/*" } }
    }
  ]
}
- Choose Next. Name it
PhotoBookS3Accessand choose Create policy.
What does it allow?
s3:PutObjectlets the app create presigned upload links.s3:GetObjectlets the app create download links and check uploaded files.s3:DeleteObjectlets the app remove files that break the rules.s3:ListBucketlets the app list the photos, but only underphotos/.
A presigned URL uses the permissions of the keys that signed it. So the browser can never do more than this policy allows.
3b. Create the user and the access keys
- In IAM, choose Users, then Create user.
- User name:
photobook-app. Do not give it console access. Choose Next. - Choose Attach policies directly. Search for
PhotoBookS3Accessand tick it. Choose Next, then Create user. - Open the user
photobook-app. Go to the Security credentials tab. - In Access keys, choose Create access key.
- For the use case, choose Application running outside AWS (or Other). Choose Next, then Create access key.
- Choose Download .csv file. This is the only time AWS shows the secret.
Save the .csv file somewhere safe. Never commit it to Git.
Your keys look like this (these are fake example values):
Access key ID:     AKIAIOSFODNN7EXAMPLE
Secret access key: wJalrXUtnFEMI/K7MDENG/bPxRfiCYEXAMPLEKEY
Step 4: Add a CORS rule to the bucket
Your page runs on one origin (for example http://localhost:8000). The bucket is on another origin (https://photobook-uploads-yourname.s3.eu-west-1.amazonaws.com). By default, a browser blocks JavaScript requests from one origin to another. CORS (Cross-Origin Resource Sharing) is a rule on the bucket that says which websites may send these requests.
- In the S3 console, open your bucket.
- Choose the Permissions tab.
- Scroll to Cross-origin resource sharing (CORS) and choose Edit.
- Paste this JSON and choose Save changes.
[
  {
    "AllowedOrigins": ["http://localhost:8000", "http://127.0.0.1:8000"],
    "AllowedMethods": ["PUT"],
    "AllowedHeaders": ["Content-Type"],
    "ExposeHeaders": ["ETag"],
    "MaxAgeSeconds": 3000
  }
]
The CORS editor in the S3 console only accepts JSON.
This rule allows only PUT requests with a Content-Type header, and only from your local computer for now. You will add your Heroku address in Step 8.
You do not need a CORS rule for showing photos. An <img> tag can load a presigned GET URL without CORS.
Step 5: Build the Flask app
Create this folder structure:
photobook/
├── app.py
├── templates/
│   └── index.html
├── requirements.txt
├── requirements-dev.txt
├── .python-version
├── Procfile
├── .gitignore
└── test_app.py        (optional)
Here is the upload flow before you read the code:
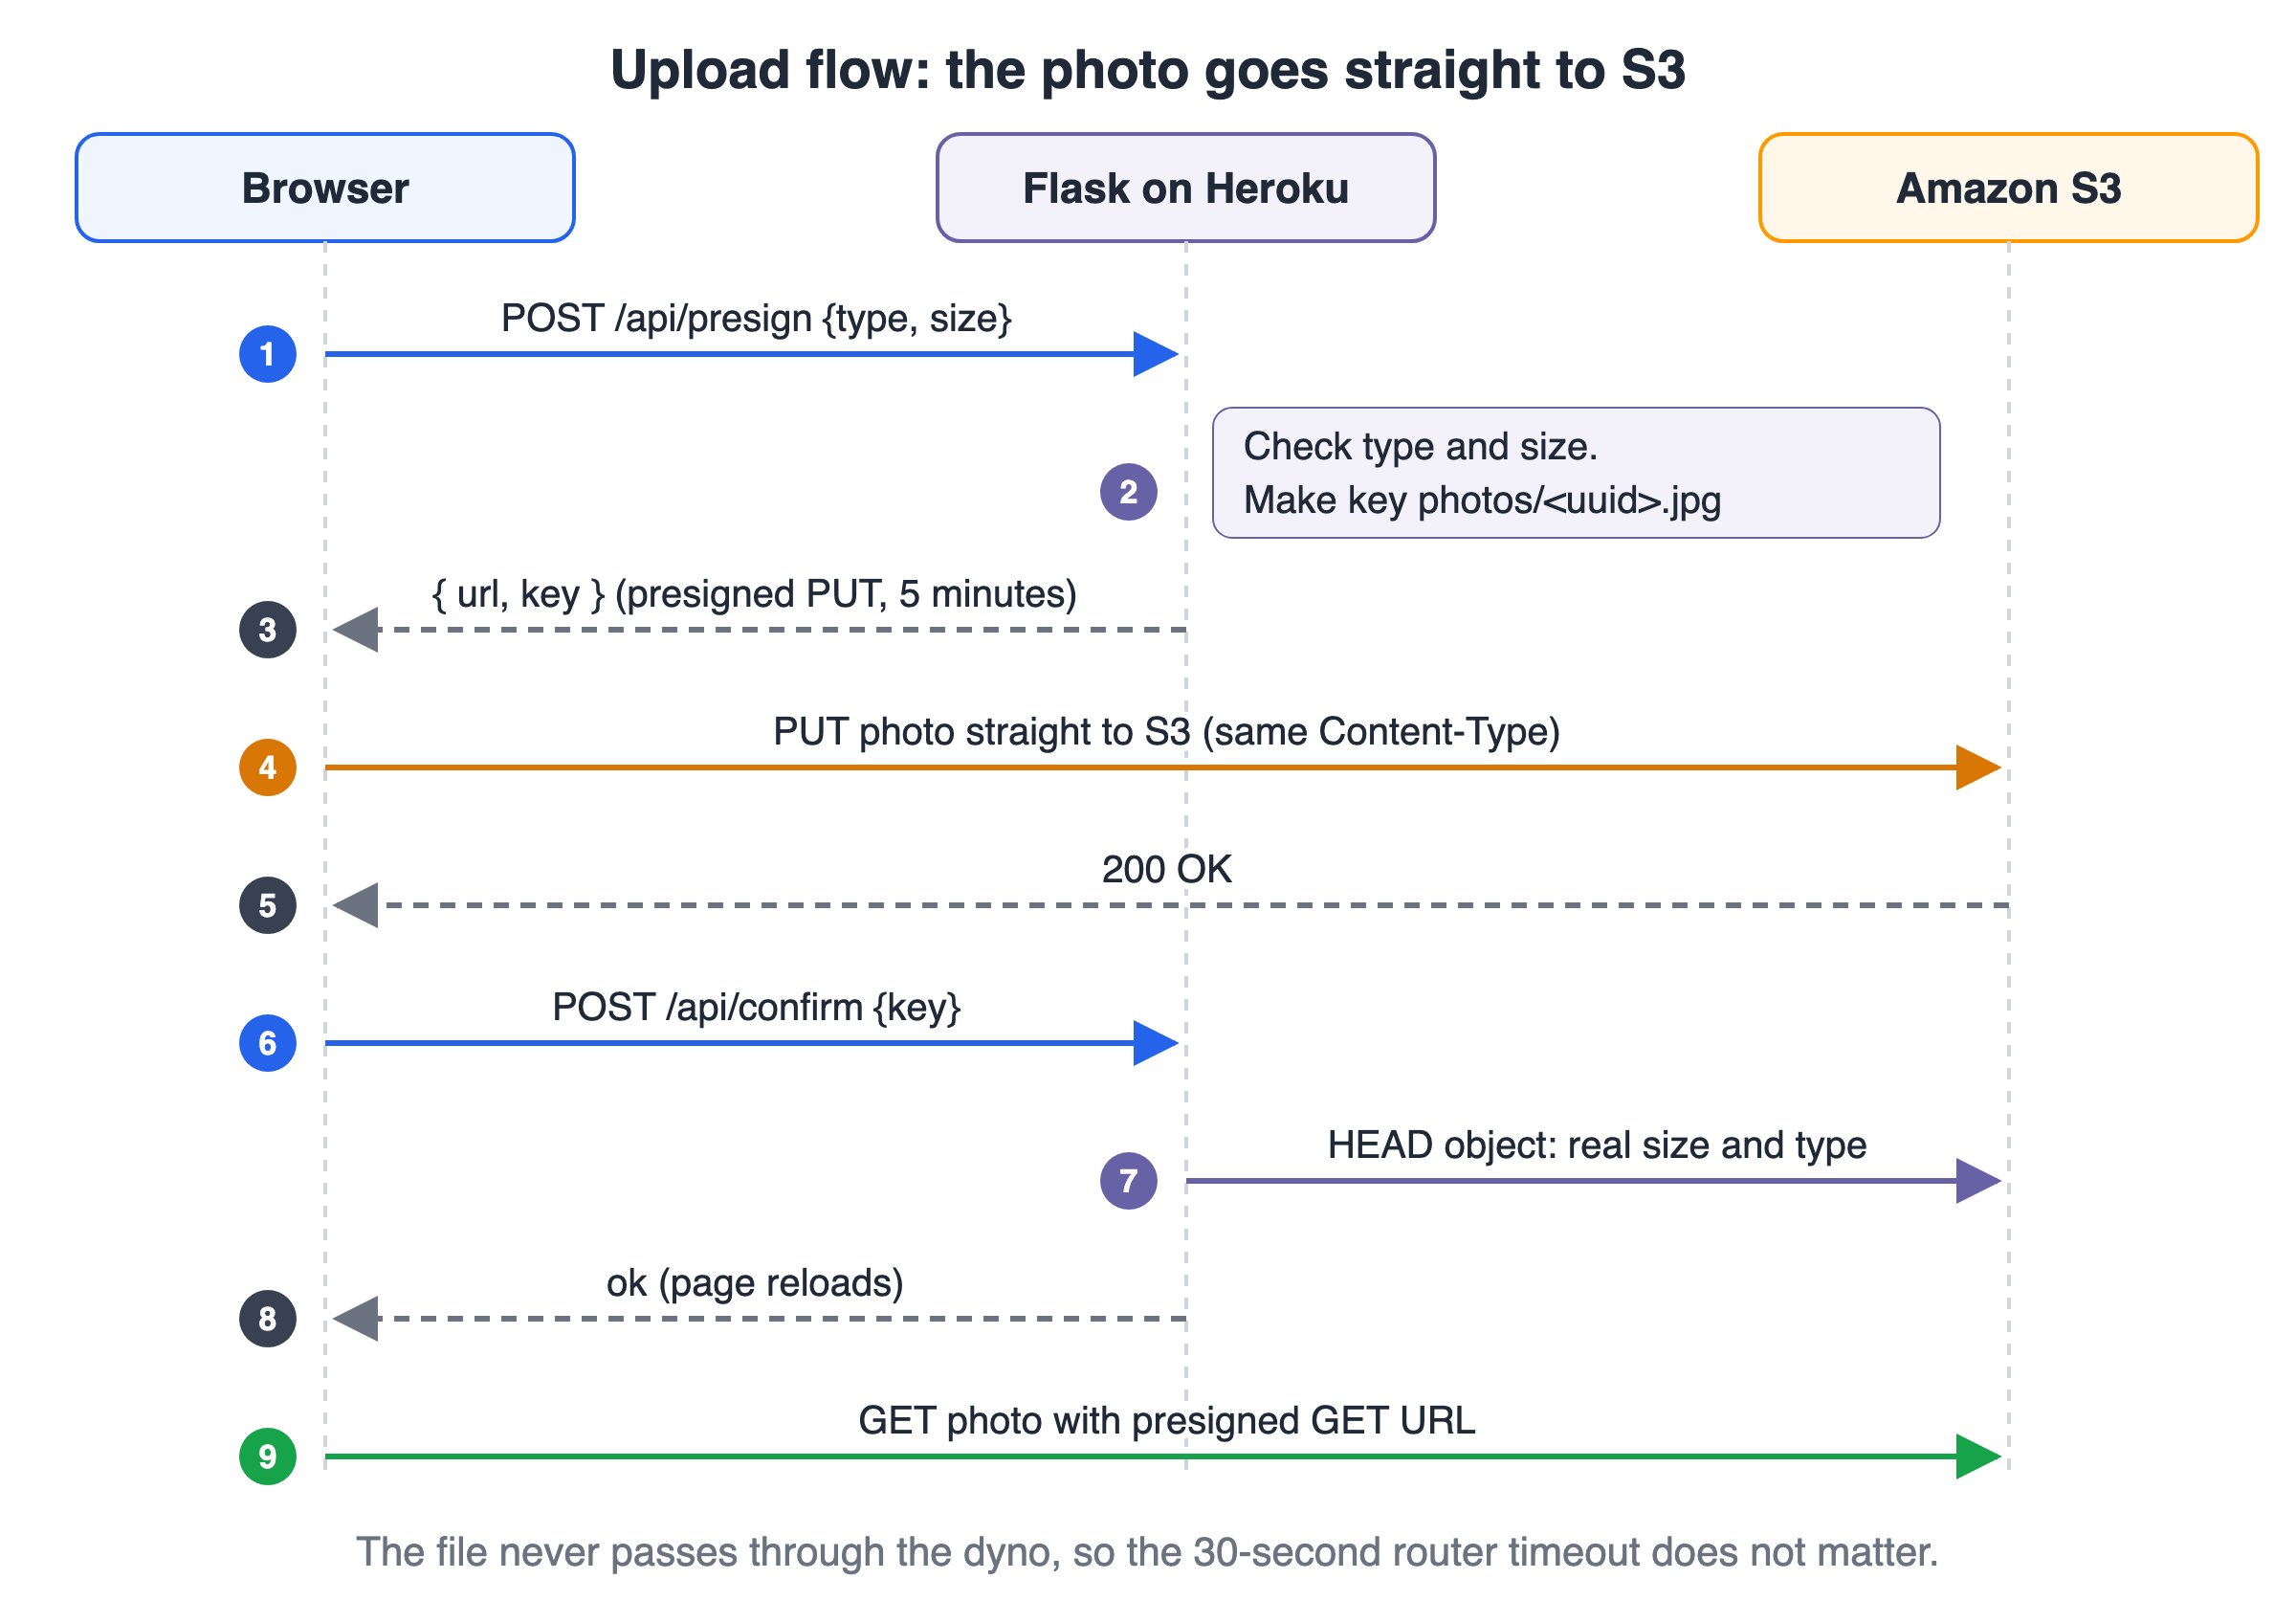
The photo goes from the browser straight to S3. Flask only signs links and checks the result.
app.py
import os
import re
import uuid

import boto3
from botocore.config import Config
from botocore.exceptions import ClientError
from flask import Flask, jsonify, render_template, request

# Settings come from environment variables (Heroku config vars).
# Never write keys or bucket names in your code.
S3_BUCKET = os.environ.get("S3_BUCKET", "")
REGION = os.environ.get("AWS_REGION", "eu-west-1")

MAX_BYTES = 5 * 1024 * 1024  # 5 MB
ALLOWED_TYPES = {
    "image/jpeg": "jpg",
    "image/png": "png",
    "image/webp": "webp",
}
KEY_PATTERN = re.compile(r"^photos/[0-9a-f]{32}\.(jpg|png|webp)$")

app = Flask(__name__)
# The photo never passes through Flask, only small JSON messages.
app.config["MAX_CONTENT_LENGTH"] = 16 * 1024

# A regional endpoint and Signature Version 4 make presigned URLs
# work in every region and with browser CORS requests.
s3 = boto3.client(
    "s3",
    region_name=REGION,
    endpoint_url=f"https://s3.{REGION}.amazonaws.com",
    config=Config(signature_version="s3v4", s3={"addressing_style": "virtual"}),
)


@app.get("/")
def index():
    photos = []
    response = s3.list_objects_v2(Bucket=S3_BUCKET, Prefix="photos/", MaxKeys=100)
    objects = sorted(
        response.get("Contents", []),
        key=lambda obj: obj["LastModified"],
        reverse=True,
    )
    for obj in objects:
        url = s3.generate_presigned_url(
            "get_object",
            Params={"Bucket": S3_BUCKET, "Key": obj["Key"]},
            ExpiresIn=3600,  # the link works for 1 hour
        )
        photos.append({"key": obj["Key"], "url": url})
    return render_template("index.html", photos=photos, max_bytes=MAX_BYTES)


@app.post("/api/presign")
def presign():
    data = request.get_json(silent=True) or {}
    content_type = data.get("content_type", "")
    size = data.get("size", 0)

    if content_type not in ALLOWED_TYPES:
        return jsonify(error="Only JPEG, PNG and WebP images are allowed."), 400
    if not isinstance(size, int) or size <= 0 or size > MAX_BYTES:
        return jsonify(error="The file must be smaller than 5 MB."), 400

    key = f"photos/{uuid.uuid4().hex}.{ALLOWED_TYPES[content_type]}"
    url = s3.generate_presigned_url(
        "put_object",
        Params={"Bucket": S3_BUCKET, "Key": key, "ContentType": content_type},
        ExpiresIn=300,  # the browser has 5 minutes to start the upload
    )
    return jsonify(url=url, key=key)


@app.post("/api/confirm")
def confirm():
    data = request.get_json(silent=True) or {}
    key = data.get("key", "")
    if not KEY_PATTERN.match(key):
        return jsonify(error="Invalid key."), 400

    try:
        head = s3.head_object(Bucket=S3_BUCKET, Key=key)
    except ClientError:
        return jsonify(error="Upload not found."), 404

    # The browser can lie, so check the real file in S3.
    if head["ContentLength"] > MAX_BYTES or head["ContentType"] not in ALLOWED_TYPES:
        s3.delete_object(Bucket=S3_BUCKET, Key=key)
        return jsonify(error="File rejected: wrong type or larger than 5 MB."), 400

    return jsonify(ok=True, key=key)


if __name__ == "__main__":
    app.run(debug=True, port=8000)
Key points:
- Settings come from environment variables.
S3_BUCKETandAWS_REGIONare read withos.environ. boto3 (the AWS SDK for Python) readsAWS_ACCESS_KEY_IDandAWS_SECRET_ACCESS_KEYby itself. The code never contains a secret. - The S3 client uses a regional endpoint and Signature Version 4. Without this, presigned URLs can point to the wrong address, and the browser may get a redirect that breaks CORS.
ContentTypeis part of the signature. The browser must send exactly the sameContent-Typeheader. If it sends a different one, S3 answers403 SignatureDoesNotMatch.- Keys are random.
uuid4()makes a new name for every photo. Users cannot choose the key, so they cannot overwrite other files. /api/confirmchecks the real file. A presigned PUT URL cannot limit the file size. A bad user could lie about the size in step 1. So Flask reads the real size and type withhead_objectand deletes the file if it breaks the rules.MAX_CONTENT_LENGTHis only 16 KB. Flask only receives small JSON messages. It never receives the photo.
templates/index.html
<!doctype html>
<html lang="en">
<head>
  <meta charset="utf-8">
  <meta name="viewport" content="width=device-width, initial-scale=1">
  <title>PhotoBook</title>
  <style>
    body { font-family: system-ui, sans-serif; max-width: 900px; margin: 2rem auto; padding: 0 1rem; }
    .grid { display: grid; grid-template-columns: repeat(auto-fill, minmax(160px, 1fr)); gap: 12px; }
    .grid img { width: 100%; height: 160px; object-fit: cover; border-radius: 8px; }
    #status { margin-left: 8px; }
  </style>
</head>
<body>
  <h1>PhotoBook</h1>

  <form id="upload-form">
    <input type="file" id="photo" accept="image/jpeg,image/png,image/webp" required>
    <button type="submit">Upload</button>
    <span id="status"></span>
  </form>

  <h2>Photos</h2>
  {% if photos %}
    <div class="grid">
      {% for photo in photos %}
        <a href="{{ photo.url }}" target="_blank"><img src="{{ photo.url }}" alt="{{ photo.key }}"></a>
      {% endfor %}
    </div>
  {% else %}
    <p>No photos yet. Upload the first one.</p>
  {% endif %}

  <script>
    const MAX_BYTES = {{ max_bytes }};
    const ALLOWED = ["image/jpeg", "image/png", "image/webp"];
    const form = document.getElementById("upload-form");
    const statusText = document.getElementById("status");

    async function postJSON(url, body) {
      const res = await fetch(url, {
        method: "POST",
        headers: { "Content-Type": "application/json" },
        body: JSON.stringify(body),
      });
      const data = await res.json();
      if (!res.ok) throw new Error(data.error || "Request failed");
      return data;
    }

    form.addEventListener("submit", async (event) => {
      event.preventDefault();
      const file = document.getElementById("photo").files[0];
      if (!file) return;

      // Quick checks in the browser. Flask checks again.
      if (!ALLOWED.includes(file.type)) { statusText.textContent = "Only JPEG, PNG or WebP."; return; }
      if (file.size > MAX_BYTES) { statusText.textContent = "The file must be smaller than 5 MB."; return; }

      try {
        statusText.textContent = "Uploading...";
        // 1. Ask Flask for a presigned PUT URL.
        const { url, key } = await postJSON("/api/presign", { content_type: file.type, size: file.size });

        // 2. Send the file straight to S3. Content-Type must match the signed value.
        const put = await fetch(url, { method: "PUT", headers: { "Content-Type": file.type }, body: file });
        if (!put.ok) throw new Error("S3 upload failed with status " + put.status);

        // 3. Ask Flask to check the file in S3.
        await postJSON("/api/confirm", { key: key });
        statusText.textContent = "Done!";
        window.location.reload();
      } catch (err) {
        statusText.textContent = "Error: " + err.message;
      }
    });
  </script>
</body>
</html>
The browser checks the type and size first, so users get a quick message. Flask checks again, because browser checks are easy to skip.
Step 6: Add the Heroku platform files
Heroku needs to know three things: which Python to use, which packages to install, and how to start the app.
.python-version tells Heroku which Python to install. Use only the major version, so you get security updates on every build. (The old runtime.txt file is deprecated.)
3.13
requirements.txt lists the packages for production:
Flask==3.1.3
boto3==1.43.103
gunicorn==26.2.0
requirements-dev.txt lists extra packages for tests only. Heroku does not install it.
-r requirements.txt
moto[s3]==5.2.3
requests==2.32.5
Procfile (no file extension) tells Heroku how to start the web process. gunicorn is a production web server for Python. Heroku gives each dyno a port in the PORT variable, so gunicorn must listen on it.
web: gunicorn app:app --bind 0.0.0.0:$PORT
Heroku also sets WEB_CONCURRENCY, and gunicorn uses it to choose the number of workers. So you do not need a --workers flag.
.gitignore keeps local files out of Git:
.venv/
__pycache__/
*.pyc
.env
Step 7: Run and test the app on your computer
Create a virtual environment and install the packages:
cd photobook
python3.13 -m venv .venv
source .venv/bin/activate        # Windows: .venv\Scripts\activate
pip install -r requirements.txt
Set the environment variables. Use your bucket name and the keys from Step 3.
export S3_BUCKET=photobook-uploads-yourname
export AWS_REGION=eu-west-1
export AWS_ACCESS_KEY_ID=AKIAIOSFODNN7EXAMPLE
export AWS_SECRET_ACCESS_KEY=wJalrXUtnFEMI/K7MDENG/bPxRfiCYEXAMPLEKEY
python app.py
On Windows PowerShell, use $env:S3_BUCKET="photobook-uploads-yourname" for each line.
You should see:
 * Serving Flask app 'app'
 * Debug mode: on
WARNING: This is a development server. Do not use it in a production deployment.
 * Running on http://127.0.0.1:8000
Press CTRL+C to quit
 * Debugger is active!
Open http://localhost:8000. Choose a JPEG or PNG photo and click Upload. After a second, the page reloads and shows your photo. Open the S3 console. You will see the file under photos/.
Optional: run the automatic tests. The file test_app.py uses moto, a library that fakes AWS on your computer. It needs no AWS account and makes no real requests. It checks the home page, valid and invalid uploads, the 5 MB limit, presigned GET links, and that a presigned PUT URL fails with a different Content-Type. It also checks that gunicorn can load the app.
pip install -r requirements-dev.txt
python -m unittest -v test_app.py
You should see:
test_gunicorn_can_load_the_app (test_app.GunicornTest) ... ok
test_bad_types_are_rejected (test_app.PhotoBookTest) ... ok
test_confirm_deletes_file_that_is_too_big (test_app.PhotoBookTest) ... ok
test_confirm_rejects_bad_keys (test_app.PhotoBookTest) ... ok
test_home_page_renders (test_app.PhotoBookTest) ... ok
test_large_files_are_rejected (test_app.PhotoBookTest) ... ok
test_listing_shows_photo_with_presigned_get_url (test_app.PhotoBookTest) ... ok
test_presigned_put_needs_same_content_type (test_app.PhotoBookTest) ... ok
test_valid_upload_is_stored_with_content_type (test_app.PhotoBookTest) ... ok

----------------------------------------------------------------------
Ran 9 tests in 1.201s

OK
Step 8: Create the Heroku app and set config vars
First, put your project in Git:
git init
git add .
git commit -m "PhotoBook: Flask + S3"
git branch -M main
Create the app in the eu region. App names are global, so pick your own name.
heroku create photobook-yourname --region eu
(For US users: heroku create photobook-yourname --region us, with a bucket in us-east-1.) You cannot move an app to another region later, so choose carefully.
Now give the app its settings as config vars:
heroku config:set S3_BUCKET=photobook-uploads-yourname AWS_REGION=eu-west-1 \
  AWS_ACCESS_KEY_ID=AKIAIOSFODNN7EXAMPLE \
  AWS_SECRET_ACCESS_KEY=wJalrXUtnFEMI/K7MDENG/bPxRfiCYEXAMPLEKEY
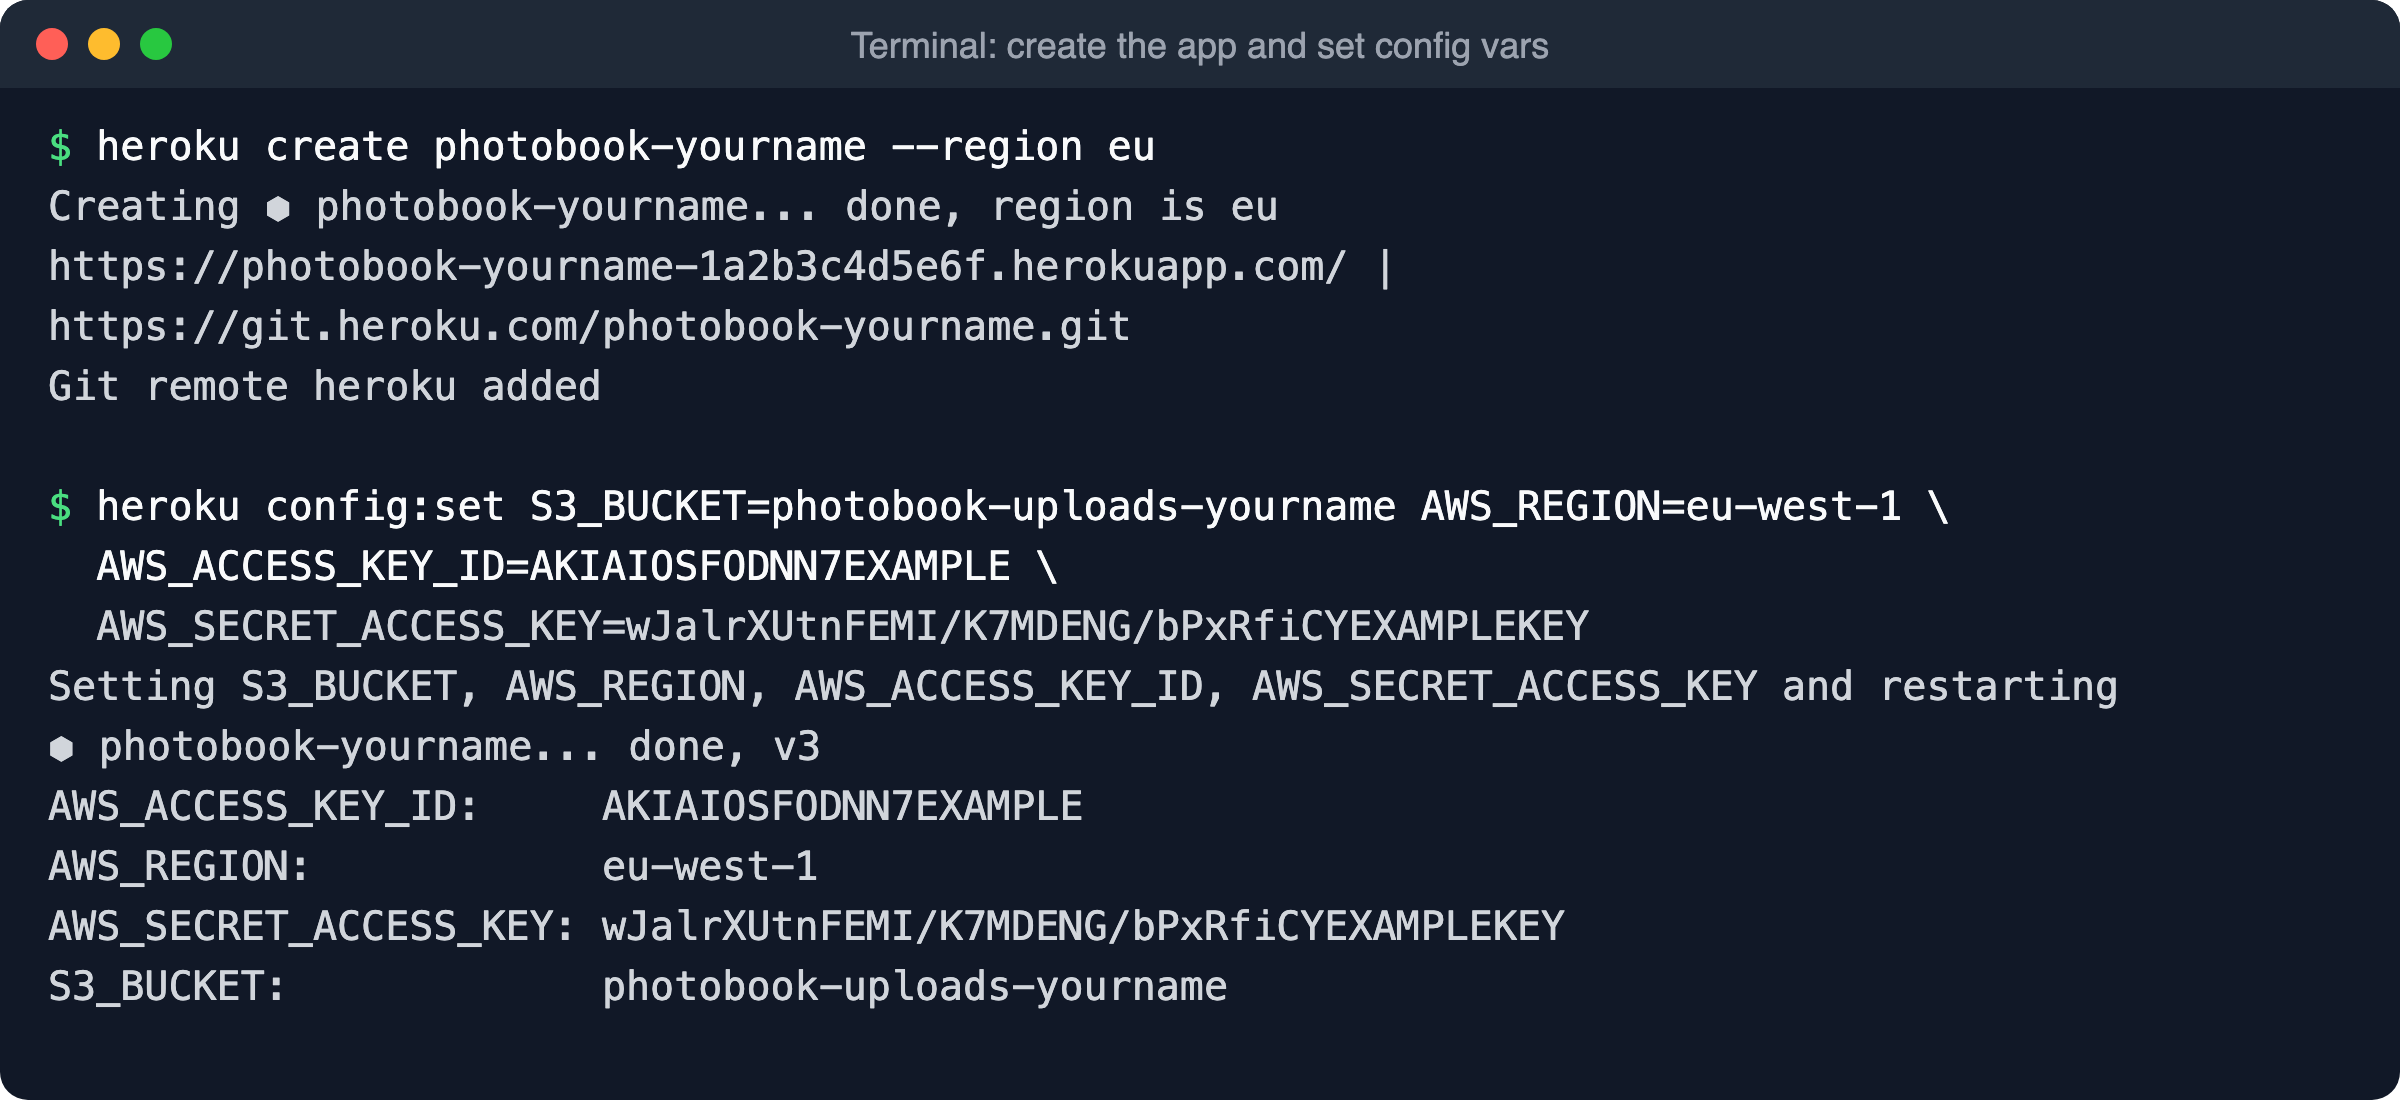
heroku create prints your app URL. Copy it for the CORS rule.
Commands are saved in your shell history. If you do not want the secret there, use the dashboard: your app → Settings → Reveal Config Vars. Every config var change restarts the app.
The four config vars in the Heroku dashboard.
Check them any time with:
heroku config
Now update the CORS rule. Go back to the bucket's CORS editor (Step 4) and add your Heroku URL. Copy it from the heroku create output, but remove the slash at the end. An origin never ends with /.
[
  {
    "AllowedOrigins": [
      "https://photobook-yourname-1a2b3c4d5e6f.herokuapp.com",
      "http://localhost:8000",
      "http://127.0.0.1:8000"
    ],
    "AllowedMethods": ["PUT"],
    "AllowedHeaders": ["Content-Type"],
    "ExposeHeaders": ["ETag"],
    "MaxAgeSeconds": 3000
  }
]
Step 9: Deploy with git push
git push heroku main
Heroku receives your code and builds it. It reads .python-version, installs Python, installs requirements.txt, and reads the Procfile.
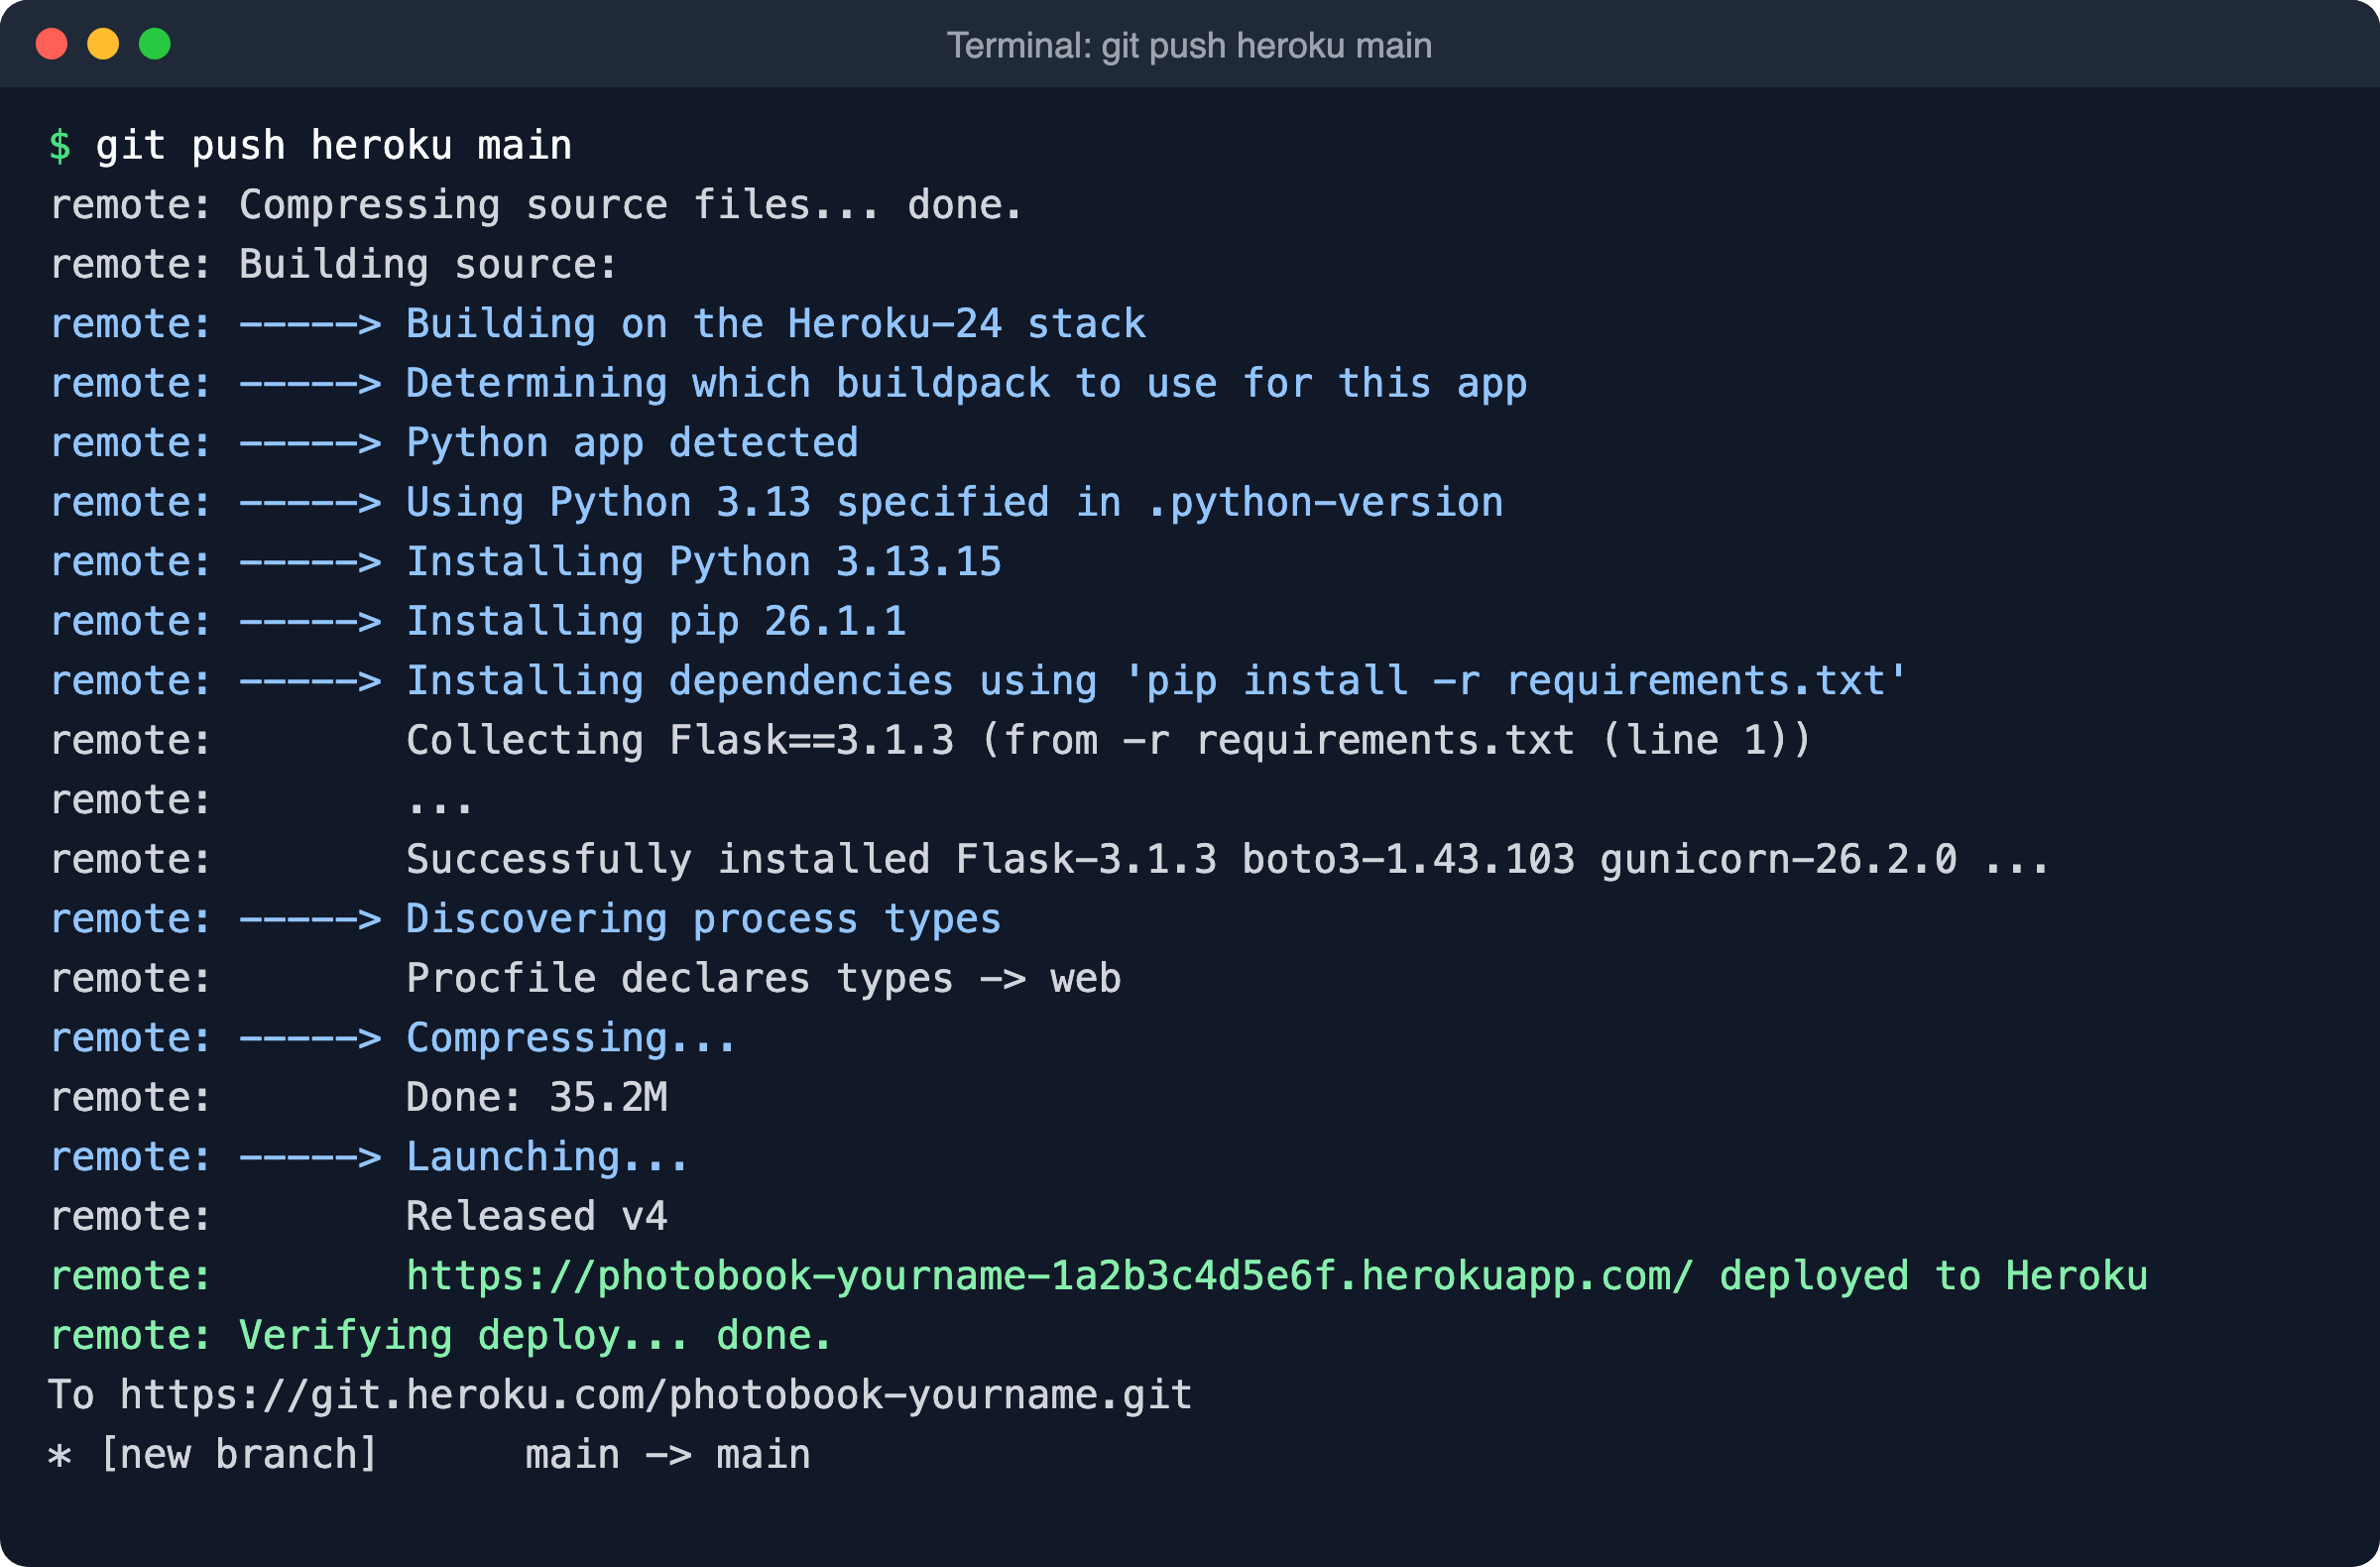
A successful build ends with "deployed to Heroku" and "Verifying deploy... done."
Your version numbers may be a little different. That is fine.
Step 10: Test the live app
heroku open
The browser opens your app. Upload two or three photos. Each photo should appear in the grid after the page reloads.
PhotoBook running on Heroku. The photos come from the private bucket.
Two quick checks:
- Copy a photo's address and remove everything after
?. Open it. S3 answersAccessDenied, so the bucket is really private. - Run
heroku restartand reload the page. The photos are still there, because they live in S3.
Step 11: Read the logs
When something goes wrong, read the logs first.
heroku logs --tail
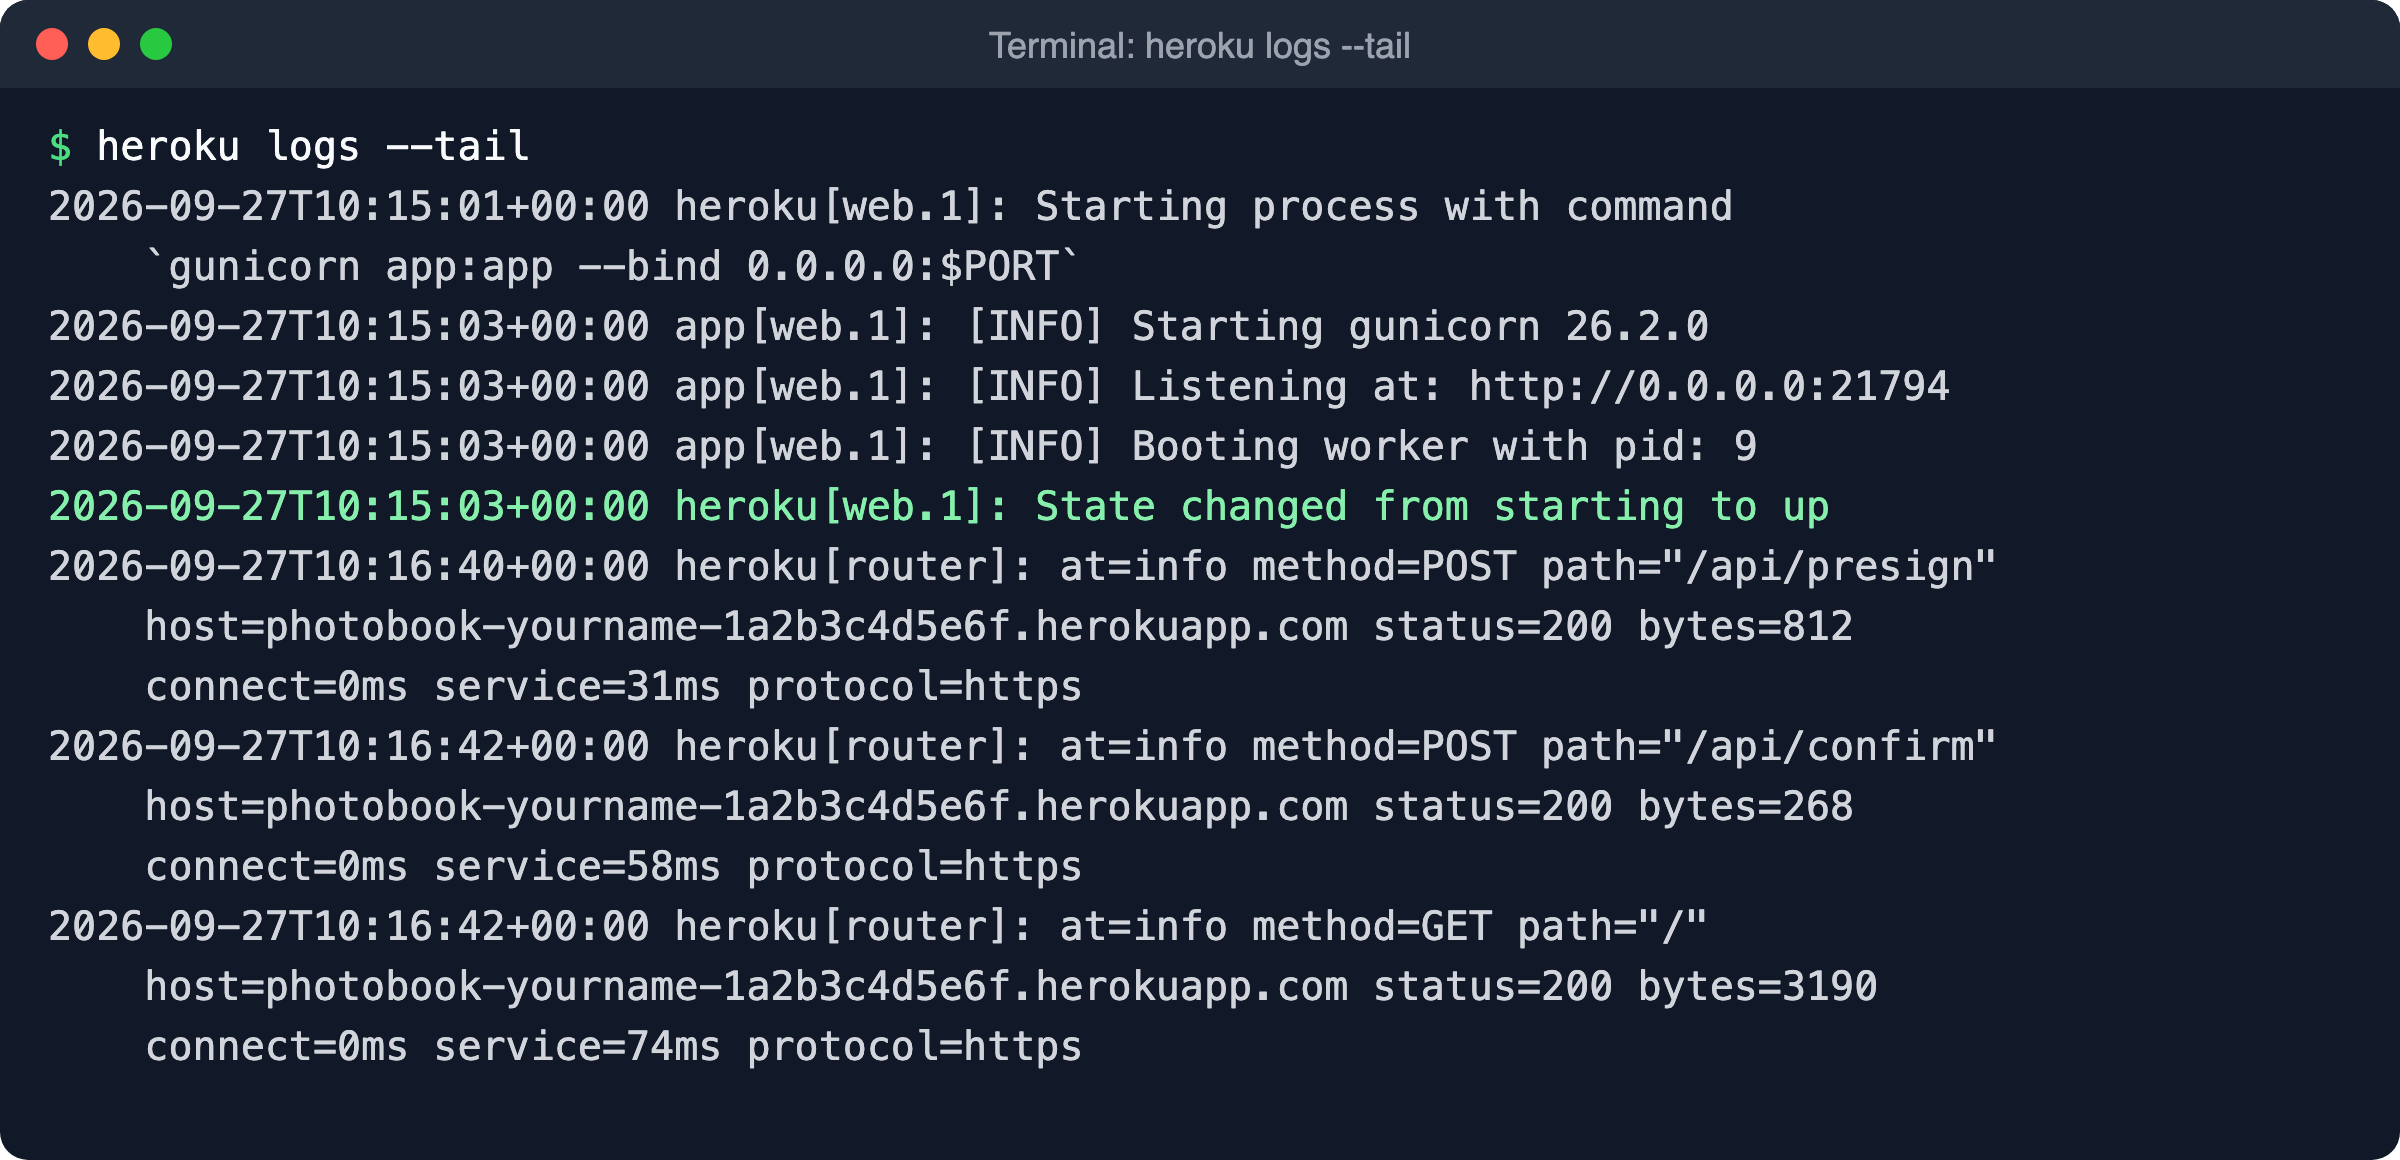
Router lines show every request, its status code and how long it took. (Some lines are shortened here.)
In a router line, status is the HTTP status code and service is the time your app needed. A line with code=H10 or code=H12 is a Heroku error (see Troubleshooting). Press Ctrl+C to stop.
Step 12: Add a custom domain and HTTPS (optional)
Your app already has HTTPS on its herokuapp.com address. For your own domain, Heroku's Automated Certificate Management (ACM) gives you a free certificate. ACM works on all dyno types, including Eco.
heroku domains:add www.example.com
heroku certs:auto:enable
The first command prints a DNS target like whispering-willow-5678.herokudns.com. At your domain provider, create a CNAME record from www to that target. Then check the status:
heroku certs:auto
Remember to add https://www.example.com to the bucket's CORS rule too.
Step 13: Clean up
When you finish, delete everything so you do not pay for it.
- Delete the Heroku app. This stops all billing for its dynos.
heroku apps:destroy --app photobook-yourname --confirm photobook-yourname
- Empty and delete the bucket. In the S3 console, select the bucket, choose Empty, and confirm. Then choose Delete. Or use the CLI:
aws s3 rm s3://photobook-uploads-yourname --recursive
aws s3api delete-bucket --bucket photobook-uploads-yourname --region eu-west-1
- Delete the access keys and the user. In IAM, open Users → photobook-app → Security credentials. For the access key, choose Actions → Deactivate, then Actions → Delete. Then delete the user and the
PhotoBookS3Accesspolicy.
Troubleshooting
-
The browser console shows "blocked by CORS policy".
Cause: the page origin is not inAllowedOrigins. Often the Heroku URL has a slash at the end, or you usedhttpinstead ofhttps.
Fix: copy the origin from the browser address bar, without a path or a final slash, and add it to the CORS rule. -
S3 answers
403 SignatureDoesNotMatchto the PUT request.
Cause: theContent-Typeheader infetchis different from the one Flask signed. This also happens when the client uses the wrong region.
Fix: sendfile.typein both the/api/presignrequest and thePUTrequest. Make sureAWS_REGIONis the bucket's real region. -
AccessDeniedin the logs or in the browser.
Cause: the policy has the wrong bucket name, or the object key does not start withphotos/. Or the config vars hold keys of another user.
Fix: check both ARNs in the policy. Runheroku configand compare the key ID with the one in IAM. -
botocore.exceptions.NoCredentialsError: Unable to locate credentials.
Cause: the config vars are missing or have a typo.
Fix: runheroku config. The names must be exactlyAWS_ACCESS_KEY_IDandAWS_SECRET_ACCESS_KEY. -
at=error code=H10 desc="App crashed".
Cause: the app did not start. Common reasons are a wrongProcfile, a missinggunicorninrequirements.txt, or a Python error at import time.
Fix: read the lines above the H10 error inheroku logs --tail. Test locally withgunicorn app:app. -
at=error code=H12 desc="Request timeout".
Cause: a request took more than 30 seconds. This happens if you send big files through Flask.
Fix: keep large uploads going straight to S3, as in this guide. Move slow work to a background worker. -
413 Request Entity Too Largefrom Flask.
Cause: something posted a big body to Flask. The app only accepts 16 KB, because it expects small JSON messages.
Fix: make sure the JavaScript sends the file to the S3 URL, not to a Flask route. -
Photos stop loading after some time.
Cause: presigned GET URLs expire after one hour (ExpiresIn=3600).
Fix: reload the page to get new links. You can use a longer time, but the maximum is 7 days.
Security checklist
- Block Public Access is on for the bucket.
- The IAM user has only
PhotoBookS3Access, and no console password. - Access keys live only in Heroku config vars and in your local shell. They are never in Git.
- The CORS rule lists only your real origins and only the
PUTmethod. - Flask checks the type and size before signing, and checks the real file after upload.
- Keys are random (
uuid4). Users cannot choose file names. - Presigned PUT URLs expire after 5 minutes, and GET URLs after 1 hour.
- Rotate the access keys from time to time: create a new key, update the config vars, then delete the old key.
Next steps
- Add user accounts, so only signed-in users can upload.
- Store photo details (owner, title, date) in a database like Heroku Postgres.
- Use a presigned POST with a
content-length-rangecondition, so S3 itself rejects big files. - Add an S3 lifecycle rule to delete old or unused photos.
- Make thumbnails with an AWS Lambda function when a photo arrives.
Conclusion
You deployed a Flask app to Heroku and stored its uploads in a private S3 bucket. The browser uploads straight to S3, so the 30-second router limit and the temporary dyno disk are no longer a problem. The app has small permissions and reads its secrets from config vars.
You can use the same pattern for documents, videos or avatars. Only the allowed types and the size limit change.